
On Windows computer 11 or 10 you need to create partitions on windows to segregate drive usage like if you are having 1tb of c drive data on hard disk then you can create new partition and split 1tb to 500 GB and keep 1tb data in 2 drives with 500 GB each.
You can use disk management tool on windows computer and split and create disk partition, delete or change hard drive name and delete unallocated spaces on hard drive from disk management tool.
In windows creating or deleting or managing hard disk is very simple if you know how to do it right way and the most important to perform creating managing and deleting partitions in windows it requires special permission and some special files or hard drive or hard disks, mainly this will be the case, if you don’t already have a second hard disk or partition existing or available which is large enough for your files on your windows computer.
Steps to Create, Manage and Delete Partition’s in windows
Creating, Managing and Deleting partitions is an pretty straight forward and very easy operation to perform in windows, though there are a several couple of steps you might want to perform
Step 1: First to free up slightly more space on your hard drive specifically.
Step 2: Running the Disk clean-up wizard to clean temporary and other unwanted files, and then defragmenting your hard disk. Make sure that defragmenting the drive here also applies to SSDs, which you would not normally defragment. This is because you want all the files on the disk as close to the beginning of the disk as possible.
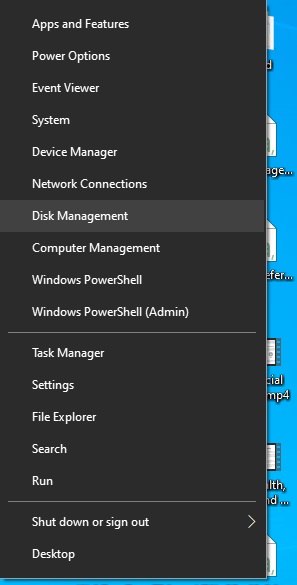
Step 3: The first operation is to shrink the size of your Windows partition. You can do this in the Disk Management console , which is most easily accessed from the Win + X administration menu. When the console appears, right-click your Windows drive
Step 4: From the menu that appears, select Shrink.
Step 5: You will be asked how much you want to shrink the partition by and if not much is available to you, try cleaning temporary files and defragmenting the disk again.
Step 6: When you are deciding how much space to shrink the drive, think about how much space you will need on your Windows partition. For general usage, 50GB is a good size (Suppose if Total size after shrink in MB box should read around 51200). If your PC id heavy user or enthusiast might want 100GB (102400) or 200GB (204800) and if you are a gamer it might want up to 300GB (307200) and even more as per user.
Step 7: After the partition has been shrunk, right-click in the unallocated space to its right and select New simple volume from the options that appear.
Step 8: A wizard will appear with the amount of recommended space for the partition , also being the maximum space available for it.
Step 9: Give the drive a drive letter a name and click Finish to complete the partition creation.
This will give you a new partition on which you can store your files and documents.
Your newly created partition will appear in File Explorer, ready for use.