
Updated: AMP Crawl Issue Anomaly error is deprecated and will not receive any crawl anomaly error in search console and you will see page indexing errors in search console.
What is AMP Crawl Issue Anomaly Error
Amp is very important these days as AMP loads faster than regular version of website and google hosts amp version of websites crawling and indexing them in google search and showing indexed amp version of website when user search for queries in google search.
If websites are having AMP version of their website then AMP-Version will be shown in google organic search on mobile devices, as it loads faster than regular non-AMP version and AMP version also shows in carousel thumbnails and many amp rich results markup is available to show in google search results and AMP pages get benefit of speed via amp pages and gets a ranking factor boost as well compared to desktop version.
Fix AMP Crawl Issue Failed Crawl Anomaly Error
If you are facing this amp crawl issue failed crawled anomaly error then simply perform or run a amp validator (https://search.google.com/test/amp) and check for errors and run a live url inspection for your AMP crawl issue errors and if everything is good then leave it to google bot to crawl and index them again. If google search console says that AMP crawl issue then google bot encountered error 5xx or 4xx error level.
Also Read:
1) How to Fix Amp Validation Errors and Types of Amp Errors
2) How to Fix Favicon Not Updating in Google Search
3) How to inspect a live url in Search Console
4) 5 Ways to Fix Crawled – Currently Not Indexed Error in Search Consoles
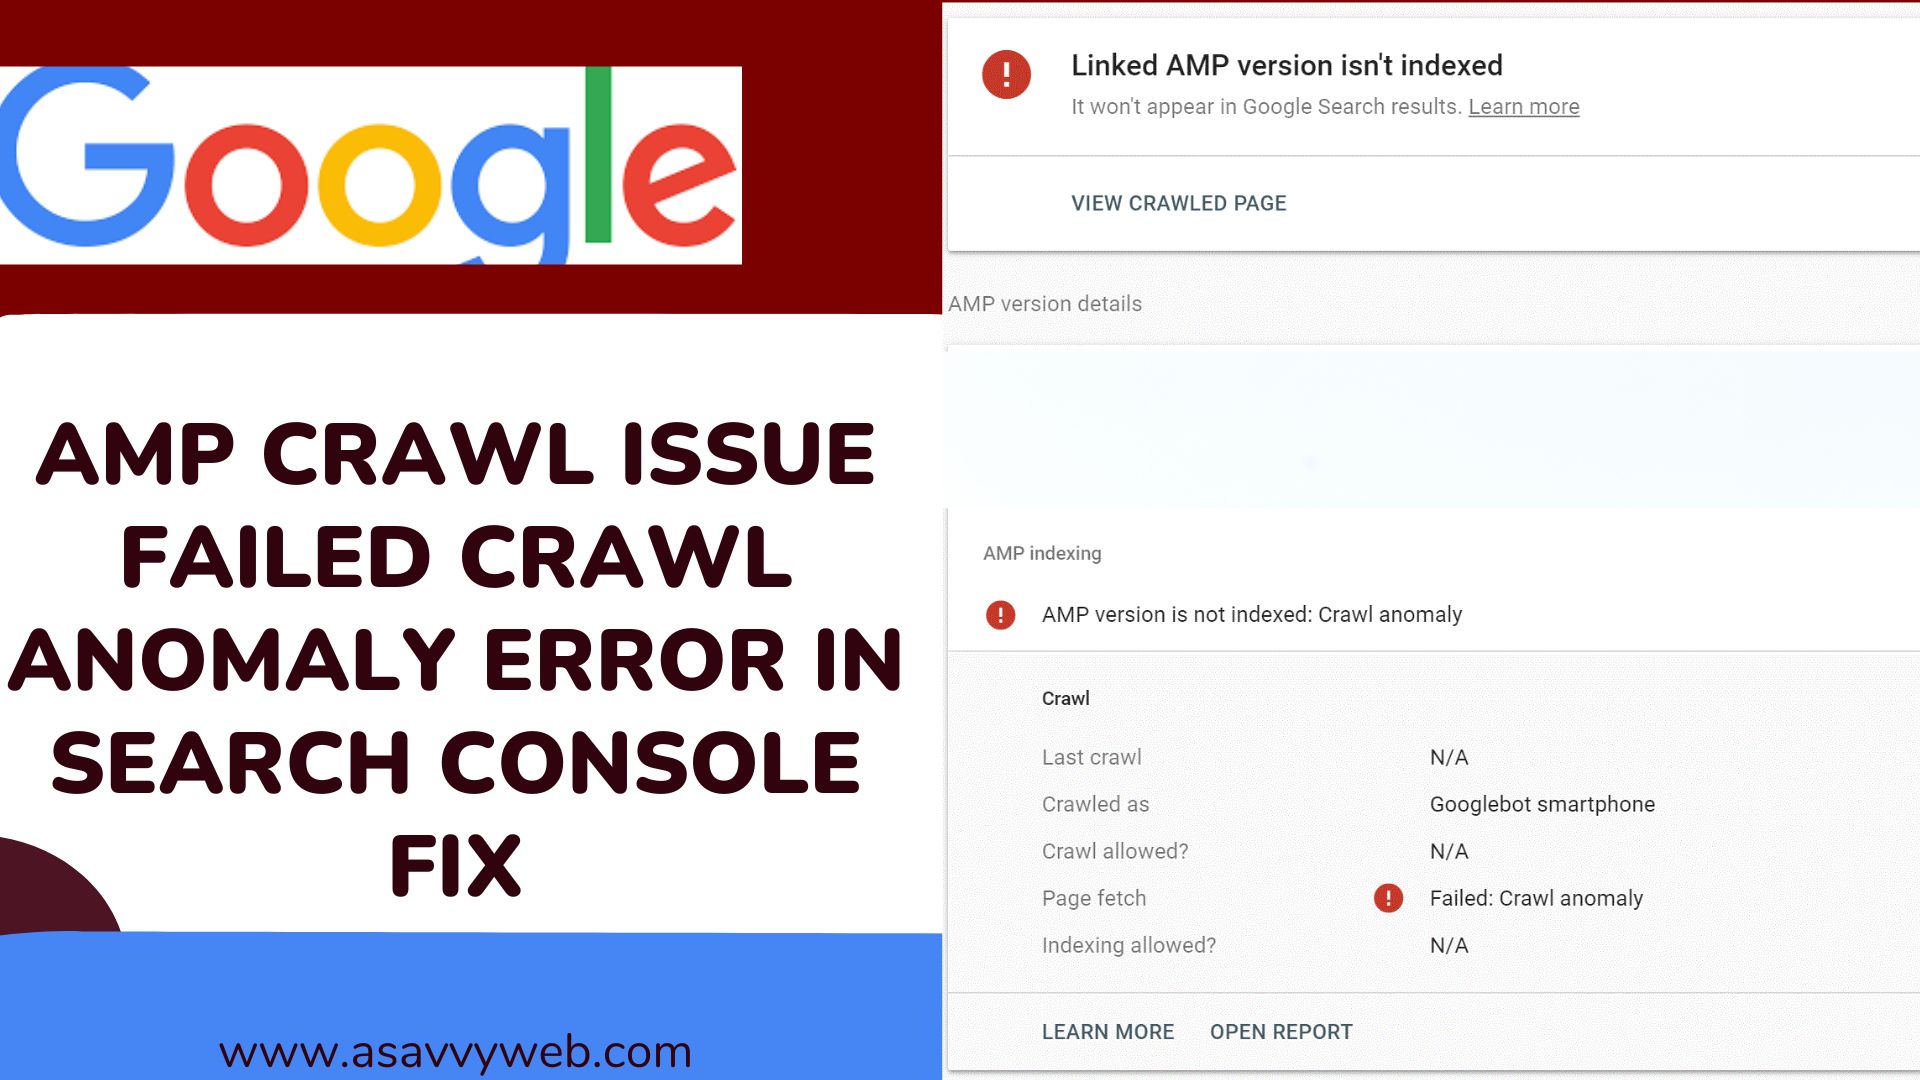
AMP crawl Issue Failed Crawled Anomaly Error
Like the website normally having non AMP version shows errors in google search console if google bot encounters any problem while fetching the website version like wise AMP version also has amp crawl issues as well like failed crawl anomaly errors also which will be triggered and shown in search console.
What is AMP Crawl Issue Failed Crawl Anomaly Error
AMP crawl issue failed crawled anomaly means when google bot tried to fetch the AMP version of the website and encountered or faced problems while fetching the page.
AMP crawl issue failed crawl anomaly is same like the desktop version only if AMP urls included with the status of amp crawl issue or amp crawled anomaly error simply says that google bot encountered a 4xx level error or 5xx error level. It may be related to 4xx level or 5xx level error and with amp crawl anomaly error there is no specified error listed or categorized coz it may be any kind of error with amp crawl issue failed crawl anomaly errors.
Related Coverage Search Console:
1. How to Fix AMP Image Size Smaller Than Recommended Size Search Console
2. URL Inspection Tool How to Use
3. Crawl This URL And its Direct Links as Fetch as Google in Search Console
4. What is robots.txt File in SEO and Uses of Robots File
5. Fix Submitted URL Has Crawl Issue Errors in Search Console
What to Do with AMP Crawl Issue Error Failed Crawled Anomaly Error
If you are facing AMP crawl issue failed crawled anomaly as the fetch status then you need to follow these steps to fix crawl issues:
1. Perform AMP validator Test:
2. Structure Data markup
4. Request Indexing
AMP validator Test for AMP Crawl issue failed Crawl Anomaly Error
First thing you need to check if you are facing Amp Crawl Issue Error failed crawl anomaly error is do a test with AMP validator test and if you have any errors in AMP pages then it will show you errors and that is the reason google bot is unable to fetch your AMP version of website and showing AMP crawl error failed crawl anomaly error and fix error in amp validator test and then you are good to go with AMP version crawl anomaly errors facing crawl issues.
Structure Date Markup Test for AMP Crawl issues errors
Also perform amp structure data test and see if you are having any structure data errors in Structure data test and fix them accordingly coz structure date is very important as structure data allows google bot to read your website content organized manner and index accordingly.
URL inspection for AMP crawl Error Issue failed crawl Anomaly
Perform a url inspection for AMP version urls and url inspection tells you what’s causing your AMP URL to face AMP crawl issue and why AMP fetch is being failed crawled anomaly in search console.
If you face any errors via url inspection then you need to fix them. If everything seems normal perform a live test in search console via url inspection.
Perform a live URL Test in Search Console for AMP Crawl Issue Failed Crawl Anomaly Error
If everything seems normal in above tests all you have to do is do a url inspection live test instead of google index status and after performing everything seems to be normal and says url is on google and amp version indexed without any errors then you are good to go and let google bot crawl your website url again and index your AMP version of your website.
Everything seems good and search console still says failed crawl anomaly then you need to leave it to google to crawl your Amp version of your website again and index them accordingly.
AMP URLs De-indexing with AMP Crawl Issue failed crawled Anomaly
Yes, urls which are facing amp crawl issue error failed crawl anomaly the urls can be deindexed from google search index until and unless google recrawls them they will not be indexed. Once google bot picks up those urls they will be indexed in google search results.