
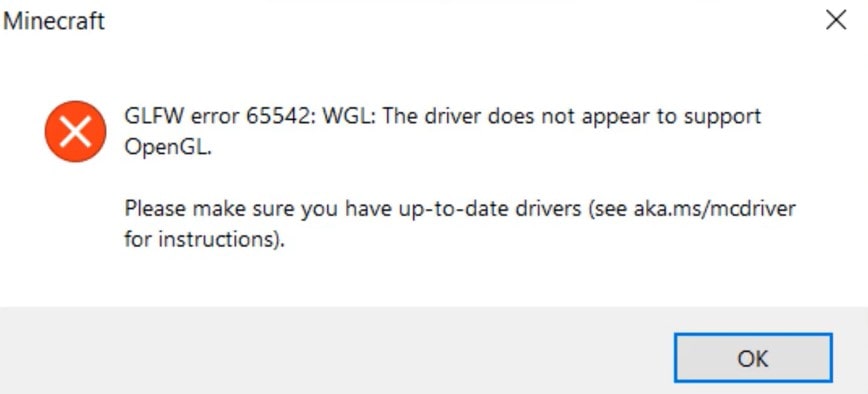
Minecraft players experience this error often and Minecraft GLFW error 6552 triggers this error when launching or opening Minecraft game and its pretty simple to fix this error and its a driver issues and you face this issue when Minecraft game doesn’t support opengl. Lets see in detail how to fix Minecraft error and download Minecraft opengl and download the DLL file to bin folder.
How to fix Minecraft GLFW Error code 6552
Step 1: Open your Web Browser and Navigate over to Google.com and in Google search open GL32 DLL download and hit enter and search for open GL32 and download it or navigate here and download opengl files here.
Step 2: The best match should be from a dll files dot com domain. Go ahead and just left click on that.
Step 3: Now you might have to scroll down little bit so there’s 64- bit downloads and 32- bit downloads you want to select the one that’s application for your computer.
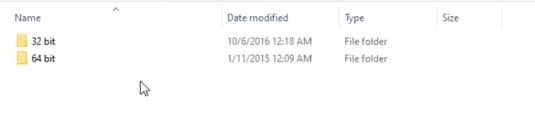
Note: If you’re running a 64-bit operating system you’d select the 64 one. Up the top otherwise we’re going to go select the 32- bit one since that’s what your computer is running. If you’re unsure you can search how to determine if you’re running a 32 or 64- bit version of the Windows Operating system. Otherwise we’re going to go ahead and just select the applicable download most of you guys are going to be using the 64-bit one.
Step 4: So anyway select the download button give a moment here and it should be in a compressed file format. So you can minimize or close out the browser.
Step 5: Open DLL file in our zip folder here and we’re going to drag it over the desktop. Close out of here.
Step 6: Click on start menu and type in File Explore best results should go back with file explore go ahead and left click on that.
Step 7: Just keep this DLL file somewhere around here so you can see when zooming in do anyway we’re going to go select this pc on the left side double click on your local disk where when it is installed on there should be a little windows icon about the hard drive so go ahead and double click on that. Do the same thing now for the program files folder.

Step 8: Double click on java and now that we’re in java here you want to go open up the JRE folder and now there should be a bin folder. So just drag this DLL file into the bin folder.
Step 9: So, it says move the bin. So we’re just going to go drag it in. It says you’ll need to provide administrator permission to move to this folder.
Step 10: Select continue and once you know what that simple as that you can just close out of here restart your computer and then the issue should have been resolved.
That’s it, this is how you fix Minecraft GLFW Error Code 65542 and once you move dll file to bin folder your issue Minecraft GLFW Error Code 65542 error will be fixed which says Driver Does not appear to support OpenGL.
How do you fix error 65542 on Minecraft?
Download opengl dll file and copy and paste it to bin folder -> c drive -> program files -> java folder JRE -> bin folder and paste the dll files. If prompted for administrator right -> just go ahead and click on yes. If it asks for replace then go ahead and replace opengl dll file.
Minecraft is lagging when playing game or stucks or responding slow?
When you are playing Minecraft and you are experiencing slow or lagging issues then this means that your system is not supporting or not enough cable of handling graphics and you need to upgrade your graphic card in this case to fix Minecraft lagging issues or slow responding when playing Minecraft game on your computer.
Download openGl dll files -> copy and paste dll file in to java folder -> JRE -> Bin folder -> and paste openGL dll file and restart your computer.
You need to copy and paste file in this location -> your C drive -> Program Files -> Jave Folder -> JRE -> Bin folder and paste the DLL file.